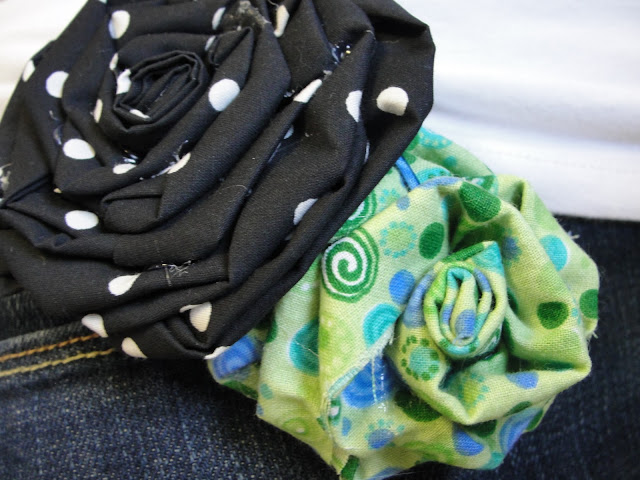
Girl's camp craft #4 - Flower pins

This craft was super easy on the pocket book.  We asked for fabric donations and ended up with way more than we even needed.  The other supplies included safety pins and hot glue.  Since we were lucky enough to have a hefty stash of both in our stake young women's closet, we got by without spending a single penny.  Cha Ching!  Bonus: the girls looked super cute walking around camp with flowers pinned to their hats, backpacks, sweaters, etc.

Here are the instructions I provided our young women:

Flower Pins
1.      Start by heating up a hot glue gun.  Make sure you keep it on something that it can’t damage (there’s a trivet provided).  Also, please, PLEASE don’t burn yourself!  A little glue goes a long ways so, prevent dripping on yourself by using just a tiny bit.  I think most of the little hot glue guns don’t heat up as hot and thus are better than the large ones!

2.      Cut a long strip of fabric about 2-3” wide.

3.      Fold it in half and then fold it in half again.  A little hot glue can help keep it folded.


4.      Roll it around itself a few times.  This will be the center of your flower.  Secure with hot glue.

5.      Now, wrap the fabric around the roll while twisting it to form petals.  After every twist, use a dab of hot glue to hold it.

6.      When your flower is as big as you want it or you run out of fabric, cut a circle out of matching fabric to use as a backing.  It doesn’t need to be perfect but, it should be slightly smaller than your flower. 

7.      Now cut two slits in the back of your circle to allow a place for your safety pin to poke through.

8.      Slide the safety pin into position and then hot glue it down to the center, back of your flower

  Finish it off by hot glue the edges of the circle down around the back of the flower.

Now you can pin it to sweaters, headbands, hats, jackets, purses, backpacks, etc.

Girls camp craft #3 - Bottle cap magnets

I think the bottle cap magnets were the crowd favorite craft at girl's camp this year.  Everyone was having such a hard time choosing just one to make.  I think next year we might make a set eight that incorporate all the young women value colors.  Cute idea right?  Anyways, here's how we created these little pretties.

Bottle Cap Magnets
1.       Using the 1” circle punch, punch the circle image you choose to use out of the photo paper.  Be careful not to destroy any of the other images so others can use them.  When punching, hold the punch upside down so you can see that you are punching in the correct spot.


2.       Now apply modge podge to the inside of a bottle cap using a small paint brush


3.       Place your circle image inside the center of the bottle cap
4.       Apply another layer of modge podge to the top of your image to make sure everything is sealed in.

5.       After the modge podge has dried (this takes a few minutes) apply glossy accents inside the bottle cap, covering your image.  You don’t need to fill the whole bottle cap up.  In fact, we would prefer you don’t so we have enough glossy accents for everyone’s project.

6.       Now squeeze a small amount of E-600 glue onto the back of a magnet and glue it to the back of your bottle cap.  Don’t tip your bottle cap upside down while doing this or the glossy accents will run out.  ***Make sure the magnetic side of the magnet is facing out so it will work as a magnet for your fridge or magnet board.
 
7.       Find a safe place for it to dry.  It will take about 24 hours.

Girls camp craft #2 - Subway art

For the second craft I put together for our Girl's Camp was a simple little subway art project based on our camp's theme.  Our theme was the word "SEEK" taken from the 13th article of Faith.  "We believe in being honest, true, chaste, benevolent...if there is anything virtuous, lovely, of good report or praiseworthy, we SEEK after these things."  Obviously, I own a vinyl cutter and thus was able to do this craft really inexpensively.  I just donated all my time to the project.  Crazy amount of time, but it was worth is to work with those sweet girls.  Anyways, here are the instructions we gave the girls for the project.


SEEK Subway Art
1.      Choose a block of wood and write your name on the back
2.       Paint the sides and front of your wood black
3.       Sand the edges after the paint dries

 Apply your vinyl decal.
a.       Your decal comes in a sheet of letters made up of three layers.  (1) the top layer – or transfer tape (2) the middle layer – which are the letters themselves (3) the shiny blue backing layer
b.      Carefully peel of the blue backing layer.   Start at a corner and peel back slowly, carefully making sure the letters stay on the transfer tape

c.       Now position your decal on your painted wood square and make sure everything is centered.  Rub it onto the board.

d.      Slowly peel off the transfer tape, leaving the letters themselves on your wood square.

Your completed project should look something like this:
Hope you Love it!

Girls camp projects

For the last couple of months I've been in Girl's Camp craft land.  Girl's camp is a yearly program done in our church for the young women ages 12-18.  They all camp together and have projects and experiences that help them form friendships and grow spiritually and emotionally.  We chose to do that this year during spring break cause it's so smoking hot here in the summer.  The weather in March was awesome and the camp was beautiful so I highly recommend it for all you southern gals.  I was asked a couple months ago to oversee the crafts for our girls at camp.  That meant I put together 10 crafts for almost 200 gals on the cheap - very cheap.  It was an insane couple of months with MANY trips to Hobby Lobby using that 40% off coupon.  I'm still tired from it all.  However, it went smoothly (for the most part) and I've even decided the ideas were worth sharing since they could be used for all kinds of crafty gatherings.

The first project I worked on were scrabble tile necklaces - here are the instructions I gave the girls:


Scrabble Tile necklaces
1.       Get a small paper plate and write your name and cabin on it.  This project requires some drying time and we need a safe place for everyone’s to dry.

2.       Choose one of the little square pictures on the photo paper and carefully cut it out.  We need all those pictures so don’t cut through anyone else’s!

 Spread a little modge podge on a scrabble tile.  Do this on the side you want covered up by your picture. 
 Center the picture on top and trim the edges using the exacto knife.  Only do this on top of the glass cutting map (we don’t want to ruin any tables!)  Please, please, be careful.  The exacto blade is extremely sharp.  If you don’t trust yourself, ask a leader to do it for you.

5.       Now apply modge podge to the top of your cute little picture and around the edges to seal everything up really well.
  After the modge podge has dried (this takes a few minutes) apply the glossy accents.  Start by making a border around the outside edges and then filling in the middle.  Don’t use too much or it will slide off the edges.  If you get a bubble in your glossy accents, you can use a straight pin to pull it out.
7.       Now we have to wait 24 hours for your tile to dry before we can glue on the bail- that’s the silver thing that holds your necklace chain or ribbon.

8.      Next day – now that your tile is dry, flip it over and apply a small amount of E-600 glue to the back, top, middle.  That’s to glue on your little silver bail.  Make sure you don’t glue in on upside down or backwards.

9.      


Choose a ribbon or cord to serve as your necklace chain.  It will be ready to wear as soon as the glue dries (about 24 hours).
 They turned out so cute and the girls loved them.  The images were ones I came up with using digital scrapbook elements in photoshop elements.  The scrapbook goodies mostly came from Creativity by Crystal.
Have fun crafting!