Christmas in July Card Swap

While day dreaming about all the Christmas crafts I could do this month, it occured to me that I'm going to need a bundle of cards to send out come this December.  We moved since last Christmas card season, leaving some amazing friends behind.  Thus, my card list has expanded.  I previously bought a couple boxes of cards at the after Christmas clearance section at Target.  But, those aren't going to quite cover it.  So, I gave myself a challenge - see how many cards you can come up with using only materials from my stash in one afternoon.  Admittedly, the afternoon stretched into dinner time and bedtime.  It pretty much looked like a bomb went off in my kitchen.  But, I accomplished a goal, so who really cares about that kitchen anyway.  Here's the results.


I was suprised at how quickly those creative juices flowed once I convinced myself that they weren't going to be perfect.  I was using leftovers after all.  But, I ended up making 23 cards that I'm not entirely too ashamed to mail and they didn't cost me a dime (until I think about postage - yuck).  If we happen to be personally aquainted, tell me which one is your favorite and you just might see it in your mail box come December.

Check out these linky parties that I've joined

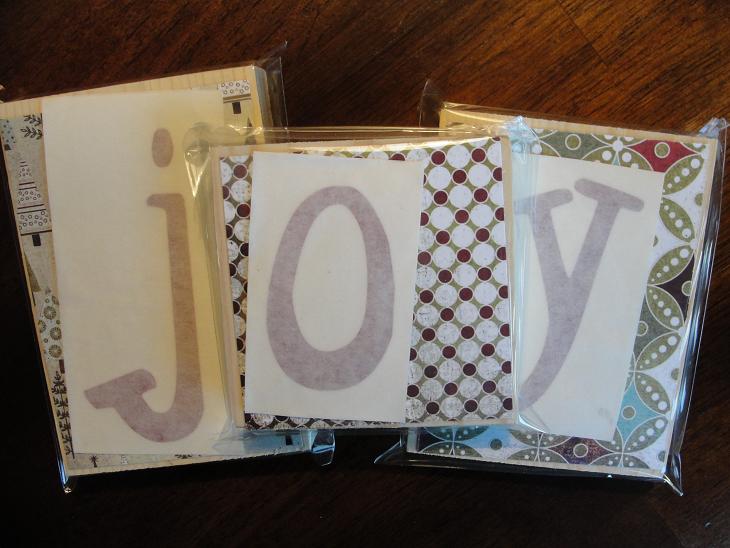
Joy Blocks

In honor of Christmas in July - presenting Joy blocks. 

This craft is super simple.  But sometimes even the simplest of things turn out cute.  I started by cutting out three wooden blocks from a 4" by 1" board.  The largest block measures approximately 5.25" by 3.5". 

Next I riffled through my paper stash to find a trio just begging to be used.  Then I painted my blocks and sanded the edges.  Honestly, when I was done painting, I wished I hadn't because the paper looked so good with the natural wood - just a little something to keep in mind. 

Then came the magic of modge podge which was followed last but not least by a vinyl letter decal.  I love giving crafts like these as gifts because everyone kind find a little corner to spruce up during the holidays. 

And, if anyone's interested, I've used the rest of those papers to create a few ready to assemble kits for the Joy blocks on my etsy page.  They come complete with the precut wooden blocks, paper, and vinyl decals.  Just a little something to make someone's crafting ambitions a little easier.
I'm linked up to these Parties!

Christmas in a Bowl!

It's about time my Christmas in July series featured a recipe to get our taste buds prepped.  I'm telling you, the Gingerbread Pudding Cake is litterally like Christmas in a bowl. 

It's not much to look at but the  aroma that fills your home while it's baking will get your taste buds tingiling.  A warm bowl full of this topped off with some whipped cream will make you trunky for fireplaces, frosty mornings and trimming the tree.  Have I got you convinced to try it yet?  Well, without further delay, Here's the recipe as promised.

Gingerbread Pudding Cake

1/4 cup butter, softened
1/4 cup sugar
1 egg
1/2 cup molasses
1/2 cup water
1 1/2 cups flour
3/4 teaspoon baking soda
1 teaspoon ground ginger
1/2 teaspoon cinnamon
1/4 teaspoon nutmeg
1/4 teaspoon allspice
1/4 teaspoon cloves
1/4 teaspoon salt

In a mixer, cream together butter and sugar.  Mix in egg, molasses and water.  Stir together dry ingredients, then add to molasses mixture and mix well.  Transfer batter to a greased 8"x8" baking dish.

3/4 cup brown sugar
1 1/2 cups hot water
5 tablespoons butter, melted

Sprinkle brown sugar over the top of the batter.  Mix together hot water and melted butter, then gently pour over the top of brown sugar (do not stir).  Bake at 350 degrees until gingerbread is cracked on top, center is set and pudding underneath has thickened, about 45 to 55 minutes.  Scoop into bowls and serve with whipped cream or vanilla ice cream.

Christmas in July Day two


I'm in LOVE with this wreath. My husband would have to disagree. He just thinks it's plain wierd. Never the less, come December, it's for sure going to be adorning our door. To me, it looks like something to could grace the pages of Potter Barn kids. I just Love their appliqued stockings and ribbon ornaments. However, unlike Pottery Barn, this project definitely won't break the bank.


I started with a $3.99 18" grapevine wreath from Hobby Lobby (and that's without a coupon)


Everything else I needed, I already had at home - fabric scraps, brads, and hot glue.


To get started, I traced some of my measuring cups on the fabric scraps. I doubled up the fabric to make the cutting go faster. I was able to get everything cut out while watching "So you Think you can dance" last night - LOVE that show.


Then I layered them up and added some scrapbooking brads I have in my collection. I didn't even close the backs of the brads-just left them pointy.


That's where the hot glue came in. I put a generous dot of hot glue right over the point of the brad and then stuck them in the grapevine wreath.

A few glue sticks later, I ended up with this.


SOOOO fun huh? I looped it with a ribbon and tried it out on my front door.

Don't worry, it's not still hanging out there. I may LOVE Christmas, but I do try to contain myself a little bit.


The best part...this huge wreath that I simply adore, cost me a whopping $4.00!

Check out the linky parties I've joined here.

Christmas in July

Before you start thinking I'm absolutely nuts to be making Christmas ornaments in July, let me explain myself.  I LOVE Christmas time of the year.  AND every year my head is swimming with Christmas crafts to make.  BUT I never do hardly any of them because the closer I get to Christmas, the more complicated my life gets.  That's the season when my business picks up, and between juggling orders, school parties, cookie baking, shopping...you can see where I'm going with this. 


So, with independence day behind us and almost four months till Halloween, I'm dedicating my creative juices to all things Christmas.  Each week of July I hope to share more Christmas craftiness, wanna join me?


To start things off, I personalised some run-of-the-mill ornaments.


I went from this - snagged at Target's after Christmas clearance this year...

To this...

In case you don't have a vinyl cutter but want to create some ornaments of your own, I'm adding these decals to my collection  at my Etsy shop.

The color choices are practically endless.  And I currently have a choice of two fonts.  I call this one Western Polka.

And here's a little Whimsy Polka.

And finally I tried to create something that can be used to document baby's first Christmas, or be used as a favor for a wedding or other special event.


Soooo...I recommend turning the AC way down, getting out your favorite Christmas candle and get busy with your favorite time of the year!
I'm linked to these parties...


Make it Yours @ My Backyard Eden